Posts

Showing posts from March, 2022

The BlueJay Build -- Part 3

Image
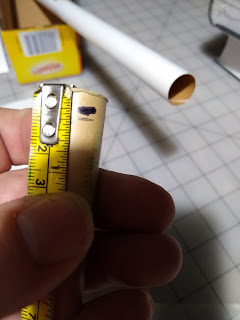
 The Thrifty Rocketeer blog continues with part 3 of the BlueJay Build... Make a mark 1/4" from the end of the spent motor casing. This will be your limit mark. In the coming step, when inserting the motor block and glue, DO NOT push the spent motor casing in farther than this mark. This assures that you can grip the motor to pull it out quickly, AND that  it will not be glued inside the body tube. Tie the motor block ring to the spent motor casing using an overhand knot or slip knot or two half hitches....whatever you like, as the next step will be to secure the knot with a drop of glue. Trim the loose stub of the Kevlar string off, and then remove the spent motor from  the loop . This assures that the motor block ring is lassoed by the Kevlar, but is free to move about, trapped on the loop. The next step is to spread a band of glue 2 1/4" down inside the REAR END of the body tube. This band of glue will seize the motor block in the next motion when shoved into place by the

The BlueJay Build - Part 2

Image
 The Thrifty Rocketeer blog continues with part 2 of the BlueJay Build... Next step is the basswood saw tooth hook assembly, but we start with the fuselage. Note that this piece has the blunt end on it and fits nicely long the spine of the glider. You can't select the wrong half, because Jay has configured them like a jigsaw puzzle. Only one fits the correct way.  As I apply glue to the joint, it occurs to me that I will have to place this under a book also...and so I select an unused corner of the Acts of Vengeance Omnibus .  This upsets my mast supporting the nosecone, but fortunately, it has dried enough that it doesn't stick when it topples over.  All is replaced and we await it to dry.  Note that the basswood fuselage is in fact thicker than the balsa wood wing, and so, the book doesn't lay quite as flat as before.  (Also note, the basswood has a slight yellow tinge to it, while the balsa wood does not.  This is of no importance.) Even before this completely dries, we

3D Printing Rockets

Image
 The Thrifty Rocketeer blog continues... A couple of rocketry friends of mine have invested in these new 3-D printers, and are looking for applications.   So far, we have stumbled across a Dragon's Head nosecone that mates with a BT-50 tube,  a spare rocket motor rack, and now, some small disposable tumble recovery fin cans and nose cones. The smallest of these parts slide onto the rear of an 1/2A3-4 or similar 12mm motor, while a similar nose cone slides onto the top.  Depending on how old or dried out your motor might be, these can be snug or looser, depending on the humidity. There's another batch that fit a B6-4 size motors  (18mm) with a similar fin can and nose cone. What I haven't told you yet, is that there is also a small launch lug ring embedded in the sides of each of these parts, so they should be aligned when they are mounted on a rocket motor.   But the real neat factor is the cant of the fins.   That is, the fins are all purposefully twisted or canted, so tha

The BlueJay build -- Part 1

Image
 The Thrifty Rocketeer blog continues... It's been a while since I did a build thread in this blog, and looking over the popularity of the posts over the last two years, it's obvious that people enjoy or read build threads a lot. So, I took advantage of a sale to score a BlueJay glider from Semroc just this week.  I found a sale on eBay for just $19.99  instead of the $21.49 that I had found on other sites.  I pulled the trigger but also let the seller know that I would call for the rocket instead of paying shipping. (I have a friend who will pick up items in the big city for me, if I pre-pay and drive over to pick them up.) To my great surprise, I received a SECOND BlueJay in the mail. Apparently someone in the shipping department failed to read the fine print and just shipped it out gratis.  That cinched it.  I'm going to do a build thread on this BlueJay. I also have been fortunate enough to find the original designer in a nearby rocket club, and he told me a bit about t

Deuces Wild

 The Thrifty Rocketeer blog continues... While watching the news, I am struck by a coincidence of timing. Recently, I got a Deuces Wild kit from Flis Kits.  And upon finishing the rocket, I decided to be creative and tr a bizarre, modern pain job of slashes of color. I started with a basic gloss while body tube, and then masked a slash or arrow of  exposed white base coat.  That's when I broke out the robin egg blue semi-gloss and painted over that exposed slash.  Once that had dried, I removed the masking tape, and again re-masked the bottom portion of the body tube, leaving most of the rocket exposed.  For this, I choose a bright gloss yellow and coated most of the rest of the rocket. The resulting mis-mash of slashes and arrows, came out robin egg blue on the top half, and bright loss yellow on the bottom half. This week, I'm seeing all kinds of flags, backgrounds, logos, memes and other designs mimicking the Ukrainian flag. What are the odds? I painted my rocket months befo

Shotgun!

Image
 The Thrifty Rocketeer blog continues... It's been about a quarter of a year since our last club launch, and several rockets had flown out of the field to be snagged high in tall trees. After several months, two of the larger, more colorful chutes have been spotted, but so far, we have not found anyone with a drone to attempt to lift them out of the trees. Recently, someone suggested using a shotgun. Now, I have heard of using a bow and arrow with a string to fire into a tree and loop over an offending branch, making an arc to either pull up a stronger rope, or just pull down the limb and free the rocket. However, the use of a shotgun for this purpose escaped me. The person who suggested it said he has a shotgun and would be willing to fire AT THE BRANCH, severing it and allowing the rocket to drop down to the ground. Now, I don't own a gun, so I can't speak to how good one's aim must be...nor how much shotgun shells go for...or what happens to the spent buckshot, once

Trading Cards

Image
 The Thrifty Rocketeer blog continues... An opportunity has come my way to possibly write instructions for a future model rocket kit. This has started me thinking about which instructions I have enjoyed the most, and just how many (40+) rocket kits I have assembled over the last seven years.  I broke out my 3-ring binder where I had filed virtually all the printed instructions from over the years. (Thank goodness I saw the handwriting on the wall, when I realized that I wasn't going to be able to remember which motors were required for which rocket.  I started a binder to collect the instructions for easy reference .) About this time, I also discovered the Estes Rockets were going through a phase where they were designing a small trading-card size summary for the rocket motors that were required for each model. You would find the dotted line printed on the card stock and cut out the card, so that it would fit in your pocket, in the launch box, or be saved. It was a brilliant mov

Tally Ho!

The Thrifty Rocketeer blog continues... So, it's hard to believe that we're now 130 blog entries in...over the last two years. And while I've tried to post once a week, sometimes that's a bit off.  But I began to wonder, what was the posting that inspired the most responses....that is, what's the highest number of comments that I got on any one blog post. I was beginning to count them up, when it occurred to me that I could/should be check the number of views that I have received, as a more accurate indicator of interest.  And I discovered something very curious when doing that count. First, every post gets about two dozen views. So I started limiting my count to those that fall above, say, 40 views.  I'll share those topics or titles below. But I also noticed a clear trend, that the blog posts with the absolute zenith of view are those that deal with tools and supplies.  I suspect the highest one comes up because it is the first one that results after a google

Teeth vs. Weight

Image
 The Thrifty Rocketeer blog continues... A couple of weeks ago, our club discussed that the launch equipment needed to be checked over, and the ignitor clips cleaned. This should be a regular task of the equipment manager, but as that position is currently open, I spoke up to do it... once. I volunteered to take a couple of the motorcycle/launch batteries from the storage shed and charge them on my 12 volt car battery charger.   I also looked at the ignitor clips and decided a few needed servicing.  I also have a wire wheel and a cordless drill, so I whisked a few of them clean of corrosion and inspected the lot.  One clip had fallen off the wire end. Another clip refused to move, either rusted or having lost its spring action.  Both needed to be replaced. Which brought me to the question of how to replace them.  Should it be a larger allegator clip, or just a small min-test clip with no teeth?  I always thought the small mini-clips were inferior, and didn't count on them to hold w