Posts

Showing posts from December, 2019

The New Year's Eve Parachute
Image
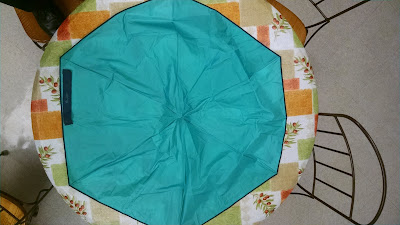
The Thrifty Rocketeer continues... An amusing follow up to my earlier  blog entry about umbrella parachutes. Just yesterday, as I was driving into work, I passed something on the roadway as I hit the entrance ramp to the expressway. This is the same location where I stumbled across a crushed Alpha II rocket several months ago. (It was pretty trashed, but someone had written "Have a Nice Day" on the nosecone. But that's another story.) I'm not sure why I noticed the aqua-blue material along the roadway, but something registered in the back of my mind.   I made a mental note and hoped it would be there on the way back, cause I was already up to 40 mph and accelerating in traffic up to the highway. Sure enough, coming back after midnight, I took the exit ramp, turned onto the shoulder and slowly inched toward the entrance point.  There it was. I turned on the flashers and trotted along the berm of the deserted roadway to where it was pinned in my headlights. 
Eggfinders & Yaggi antennae: Part 2

Image
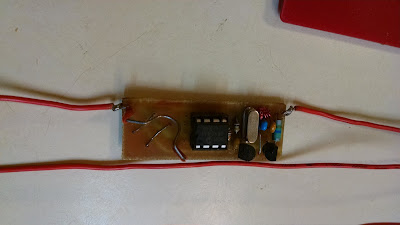
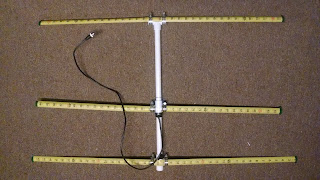
The  Thrifty Rocketeer continues... One critical feature is to have a Yaggi antenna that you can attach to your hand-held receiver, so you can walk about and receive the signal.  By pivoting and sweeping with the antenna held out at arms length, you can narrow down the direction of the strongest (loudest) signal, and know which way to walk toward it.    If you hold the antenna and receiver close to your body, you can block reception and the pick-up pattern becomes more carotid shaped, or a heart shape in front of you.  The instructions suggest that with a little practice, you can become skilled at sweeping an area and walk pretty much to the transmitter (your rocket). But, there are a couple of downsides to this concept. First, it assumes that your batteries are still fresh and operating.  Second, that the batteries haven't been knocked out of the contacts from a rough landing.  Third, that your rocket is on land or in a tree... NOT in water.   Fourth, that you have permissi

Eggfinders and tracking beacons: Part 1

Image
The Thrifty Rocketeer continues... As we come to the end of the year, I was reflecting upon the loss of my Red Nova rocket into a pond  two months ago  . When I started in this hobby about five years ago, I heard tales of people searching for their missing rocket, loosing it in the brush, in the trees or in ponds.  The horror tales of this scared me enough to try two things. First, I started writing a contact number of the inside shoulder of all my low power rockets so that "If found, call XXX-XXXX for reward".   Now, I had never determined what the reward was going to be, but I figured if someone turned up an errant rocket, the nosecone would be a focus of attention, and I might just get a phone call.  Coincidentally, last night I was flipping through a Tripoli club's web-page and found a sub-category of Lost and Found rockets.  The most recent entry was for a 39mm rocket (or remnants) found, without any ID or further description. They said the casing was in real

Super Big Bertha -- Part 1: Unpacking

Image
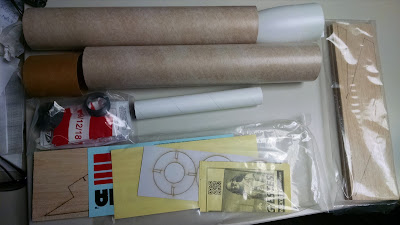
The Thrifty Rocketeer continues... The entry for today may be the start of a build thread... but for now, it's just a Xmas tale. As I've mentioned before, a package was found on my front porch last weekend. It probably wasn't in the mail, but hand-delivered from one of our club members.  I opened the box and discovered a number of smaller items, plus a boxed Super Big Bertha.  I was a bit surprised, as I didn't know one existed, or had passed it by in the big Estes pre-Christmas sale.  So, I didn't know at first that it had a motor retainer screw cap system, slotted body tube, and sandwich fins.  I had seen most of these features on separate rockets, including the Mega Mosquito. The box was opened tonight, on Xmas Eve, and this is what I found inside. There are two body tubes, one connector, a plastic nosecone, a package of hardware and parachute, a long motor mount, and two packages of balsa wood fins, one with centering rings, stickers or dec

Papering fins

The Thrifty Rocketeer continues... A short entry today. Some rocketeers swear by filling spirals.  Others insist that you seal your fins and wood. Still others  speak highly of papering your fins. Say what? The term "papering your fins" refers to gluing down paper over the surface of a wooden fin, to create a smooth, even surface, suitable for painting.  It's for those people who value appearance more than expediency... not that there's anything wrong with that... For years, I have ignored the topic, preferring to use diluted wood glue as a sealant for my balsa fins. I've already described this technique before, and I still prefer it. But about a month ago I bought an Estes kit on impulse, just because it had big fins. They were prominent, and easily accessible. In short, perfect candidates for trying my hand at papering. I read up on people's techniques, and most said "Just use a sheet of typing or copy paper, and slather it on with glue.&qu

The Broken Fin

Image
The Thrifty Rocketeer blog continues.... In the spirit of the holidays, we depart from our usual format for a Christmas tale...of sorts. Sunday morning, I slept in, but when I did get up, I walked to the front of the house, and spotted a package laying outside the front door.  This seemed odd to me, because our Saturday postal delivery is almost always after noon, and I had collected it.  But I wanted to see what was in such a large box, thinking if it had arrived on Saturday, surely someone would have seen it and brought it in. I was a bit surprised to discover that it was a large box from Estes Rockets... taped up and clearly labeled to me!  Now the box was crumpled in one corner, and a deep hole had poked through the corrugated cardboard box, but not very large. I brought the box inside and set it on one end, slicing open the sealing tape with a pair of scissors.  I reached in an extracted the air pillows, and discovered the boxed Super Big Bertha rocket!  To say I was surpr

Umbrella parachutes

The Thrifty Rocketeer blog continues... About five years ago when I first got into Model Rocketry, my first few kits were a combination of Semroc and Estes Rockets.  Each one came with a plastic Mylar parachute, carefully folded and packaged in a separate plastic baggie or envelope. You had to carefully slice the package open to slide the parachute out. The trick was not to nick or cut the chute itself, which really wasn't a problem. But after being folded and packaged for several months (if not years), the plastic parachute would have crease lines and a memory for being flattened.  It did not want to open or inflate on its own, let alone, during a speedy decent after apogee. After almost crashing a few smaller rockets, or having the chute act more like a streamer than a parachute, an experienced rocketeer gave me some suggestions.  They included: "Fluffing" the parachute before packing it back into the body tube.   "Powdering" the parachute to remove a

Skill Levels for Rocketeers

Image
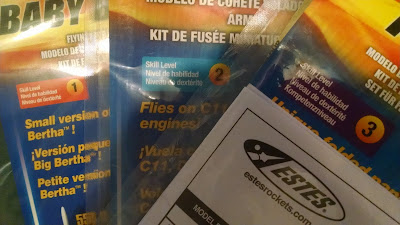
The Thrifty Rocketeer continues... OK, I'm gonna go out on a limb here. I think I know what I'm talking about here, but I admit that I most likely do not know the whole story.  And I'm not sure that it's really necessary to know the whole story to have an opinion.  it's just MY opinion, like it's my blog... It seems pretty clear to me that the largest or best known model rocketry business in the US is Estes Model Rockets.  After all, they were there at the beginning, unless you go back all the way to Goddard.  But I digress. As the arguably best-known model rocketry company, and the one most average people would think of first, due to their long history and successful advertising in Boys Life and other scouting materials... I would think that their classification system for the complexity or difficulty level for model rockets would pretty much rule. That is, if Estes says, "There are five skill levels in model rocketry"... they could pretty

Holiday gifts for the Rocketeer

Image
The Thrifty Rocketeer continues... Are you stumped what to get that rocketeer in your family?  It's even more likely that YOU'RE that rocketeer that your family is having trouble buying for. Years ago, my son went out on a limb and bought me an Alien Intruder kit for Xmas...and to my delight, I enjoyed the kit as it had a couple of unique features and design that I would never have looked at.  So all was well, I built it and flew it and then attempted to store it. And that's where the problem came in.  The trio of dowels that stuck out from the nacels or wing tips, tended to get caught on everything, and frequently snapped off. After several repairs, I found a safer place for this model on my shelf. No, I'm not here to endorse one model or kit over another.  However, if you like a kit, you could always hint around about it.  Or, just hope that your family gets something appropriate for you. The problem is one that we face in any number of hobbies where we h

Hex-3 Build Blog-- Part 3: It all comes together

Image
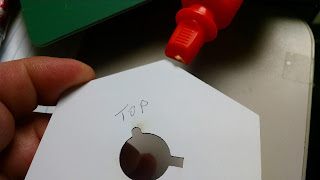
The Thrifty Rocketeer continues... This is the final installment in a simple card stock build for a platform lifter with tumble recovery from Estes. Now that the three girder legs were folded and glued, creating a triangle girder, they are ready for attachment this installment. Last installment, we also glued the thicker platform hexagonal card to the bottom of the main body and let it dry.  Now that it's dry, we're ready to insert the motor mount and glue in place. Note that the instructions show the view from the underside of the main body, and the motor mount is inserted from the top...spring clip handle first. Make certain that it is oriented to slide through the square slot in the platform base, and the round slot will accept the launch lug and align with the round slot in the bottom platform.  If they don't line up, you've got an assembly problem. As it turns out, my eyeballing the orientation of this was slightly off. I SHOULD have used the alig

Hex-3 Build-- Part 2: Folding Paper

Image
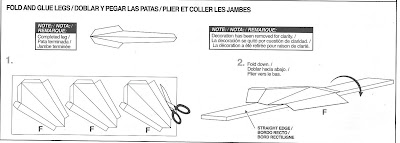
The Thrifty Rocketeer continues... This is the second part of a simple build thread for the Hex-3... an alternative rocket kit that is more of a platform lifter with tumble recovery.  The skill level is 3, but I have thought this is not that difficult. Now, we've already assembled the motor mount, and punched out the hexagonal base plate, which we used to check the alignment for the motor mount and spring clip.  Now, I've actually skipped a step in the last installment.  I decided NOT to cut out the Tube Marking Guide, instead eyeballing and checking the alignment directly. *(To do so would also have marred the instructions, as it would cut up the panel we begin with today... fold and glue legs.) First, carefully cut out the three legs from the card stock.  In my case, I used an Exacto knife and a metal edged ruler to make most of the slices that could be done by the scissors. (I also went ahead and cut out the main body from the next card sheet at the same time.)