The BlueJay Build -- Part 3
The Thrifty Rocketeer blog continues with part 3 of the BlueJay Build...
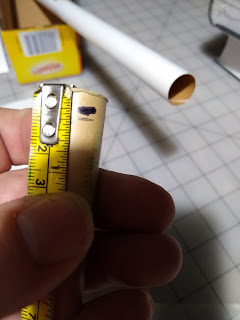
Make a mark 1/4" from the end of the spent motor casing. This will be your limit mark. In the coming step, when inserting the motor block and glue, DO NOT push the spent motor casing in farther than this mark. This assures that you can grip the motor to pull it out quickly, AND that it will not be glued inside the body tube.
Tie the motor block ring to the spent motor casing using an overhand knot or slip knot or two half hitches....whatever you like, as the next step will be to secure the knot with a drop of glue. Trim the loose stub of the Kevlar string off, and then remove the spent motor from the loop. This assures that the motor block ring is lassoed by the Kevlar, but is free to move about, trapped on the loop.
The next step is to spread a band of glue 2 1/4" down inside the REAR END of the body tube. This band of glue will seize the motor block in the next motion when shoved into place by the spent motor. Make certain you have ahold of the REAR end of the body tube, where you have recently glued the sky hook unit and the launch lug. DO NOT APPLY GLUE TO THE TOP END OF THE BODY TUBE by mistake.
Once the band of glue is inside the rear of the body tube, rotate the body tube so that the glue encircles the inside of the tube, and then begin to insert the motor block ring, trailing the Kevlar string. Using one swift motion, insert the spent motor by shoving the motor block ring ahead of it into the tube. STOP AT THE MARK 1/4" FROM THE END OF THE MOTOR CASING, and QUICKLY WITHDRAW THE MOTOR WITH A TWISTING MOTION. Do not pull the string or motor block back out. It is in place at the correct location to block new motors and apply their force at the correct point of the booster rocket, underneath the sky hook pod unit and the launch lug. Set the body tube aside for the motor block to dry in the glue.
When the glue has dried, feed the remainder of the Kevlar string through the body tube and secure it to the nosecone at the screw eye. Use a drop of glue to secure the knot you tied to the nosecone. Attach the streamer to the Kevlar string with the adhesive tape and roll the streamer tightly enough to fit into the body tube. You will add dog barf or recovery wadding BEFORE the streamer when preparing to launch.
Note: The adhesive sticker that was included in my kit appears to have been a pegboard hanger, with a hole punched in either end of the plastic strip. Only the center portion, near the fold, had adhesive. I struggled with different orientations of how do position it, and determined that it should not be used.
Instead, cut a piece of sealing tape the same length as the streamer is wide. (That is, 2" long if your crepe paper streamer is 2" wide.) Lay the tape on the table sticky side up. Position the end of the streamer halfway up the tape and press down onto the adhesive, aligning the edges. Fold the top half of the tape down over the streamer and seal the end in a "sandwich" of tape. Use a hand-held hole punch to pierce the center of your plastic and thread the shock cord through the hole.
If the glider continues to bob, add more clay. If the BlueJay glider nose dives, you have added a little too much and must subtract some clay.
Also, once the glider has been balanced, you need to observe the flight for curving left or right. If the glider sharply curves to one side or the other, add a bit of clay to the leading edge of the wing opposite the curve. In other words, if it curves to the right, add clay to leading edge of the left wing about two inches away from the fuselage.
But wait, you say, shouldn't this be painted?
A word about paint color choices: I traditionally paint my nosecone's red, and in this unit, I sealed the nosecone in prep for a light coat of red paint. However, you have a brightly colored streamer, that as long as it remains attached, should help you spot the unit during recovery much better than a small red nosecone. You could paint the whole body tube orange or red to aid in visibility, but that would clash with the color scheme of the BLUEjay.


Comments
Post a Comment