Launch Controllers and other malefunctions
The Thrifty Rocketeer continues...
Now, it many come as no surprise to you that most people have some experience with an Estes Launch controller box and wires that they got as a kid. (I said experience, not success.) Typically, they run with 4 AA batteries, a small indicator light bulb, a "key" to insert, a launch button, and about 15 feet of tangled wires that terminate in a couple of small alligator clips.

But my experience getting into the hobby was a little different. You see, I had access to Bell wire, or a twisted pair of wires that were at least 12 feet long. Now, I know that NAR safety code specifies 15 feet away from the launch pad, but let's just say the missing three feet were made up by my 6 ft 5" adult height and let it go at that, OK?

(By all means, argue with me down in the comments section...)
Also, I didn't have an Estes launch pad, but constructed my own out of a 1 ft square piece of 3/4" pine, with a couple of electrical staples and an odd 2 ft launch rod that was actually a For Sale sign stake from Lowes that I used upside down. My blast shield (take a deep breath here) was an aluminum lid from a cat food can. And my power source was a 6 volt lantern battery salvaged from a camping flashlight. That's it. No launch button, no controller.
Now I can hear the howls already... "Why didn't you buy a launch set?" "Controllers are a dime a dozen" and "Minimum safe distance". Yep, I was non-compliant. And I was sticking my toe in the water here. (Very shortly, I received not one, but FOUR controllers and two launch rod sets from various donations, so I don't want for a launch set guys...) But there is something very satisfying to building your own breadboard circuit, even if it is only a twisted pair of bell hookup wire and a pair of mis-matched alligator clips.
 Having read the NAR safety code, I knew the corners I was cutting, and the risks that were inherent as an adult. And I took my chances. I also have great respect for higher power rockets and the need for such safety measures as PA systems, fire suppression, and a lock-out launch controller.
I can tell you two or three things that I learned rather quickly.

 I also have picked up some good tips on how to extend your wiring and therefore your blast zone for all rocket launches.... those orange construction cords that come in 25 or 50 ft length need not always conduct 110 volts AC. They can also act as the most simple of extension cords to conduct 6 volts DC to a launch pad. And they are pretty easy to coil and throw out (...like a life line toward a drowning man.)

Now, it many come as no surprise to you that most people have some experience with an Estes Launch controller box and wires that they got as a kid. (I said experience, not success.) Typically, they run with 4 AA batteries, a small indicator light bulb, a "key" to insert, a launch button, and about 15 feet of tangled wires that terminate in a couple of small alligator clips.

But my experience getting into the hobby was a little different. You see, I had access to Bell wire, or a twisted pair of wires that were at least 12 feet long. Now, I know that NAR safety code specifies 15 feet away from the launch pad, but let's just say the missing three feet were made up by my 6 ft 5" adult height and let it go at that, OK?
(By all means, argue with me down in the comments section...)
Now I can hear the howls already... "Why didn't you buy a launch set?" "Controllers are a dime a dozen" and "Minimum safe distance". Yep, I was non-compliant. And I was sticking my toe in the water here. (Very shortly, I received not one, but FOUR controllers and two launch rod sets from various donations, so I don't want for a launch set guys...) But there is something very satisfying to building your own breadboard circuit, even if it is only a twisted pair of bell hookup wire and a pair of mis-matched alligator clips.
I can tell you two or three things that I learned rather quickly.

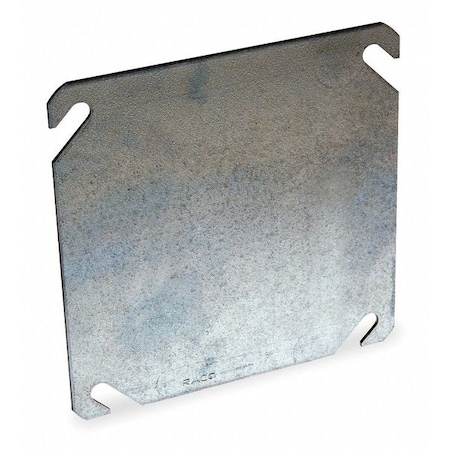
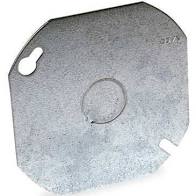
- Cat food can lids made of aluminum melt through with the lowest of low power motors. Clean through. (This is one reason why junction box plates are so popular!
- It takes just about as much time to untangle a launch controller 15 foot ball of wire as it does a 12 foot twisted pair.
- Bell wire gets hot if you hold it against a battery for more than just a few seconds, until your igniter starts
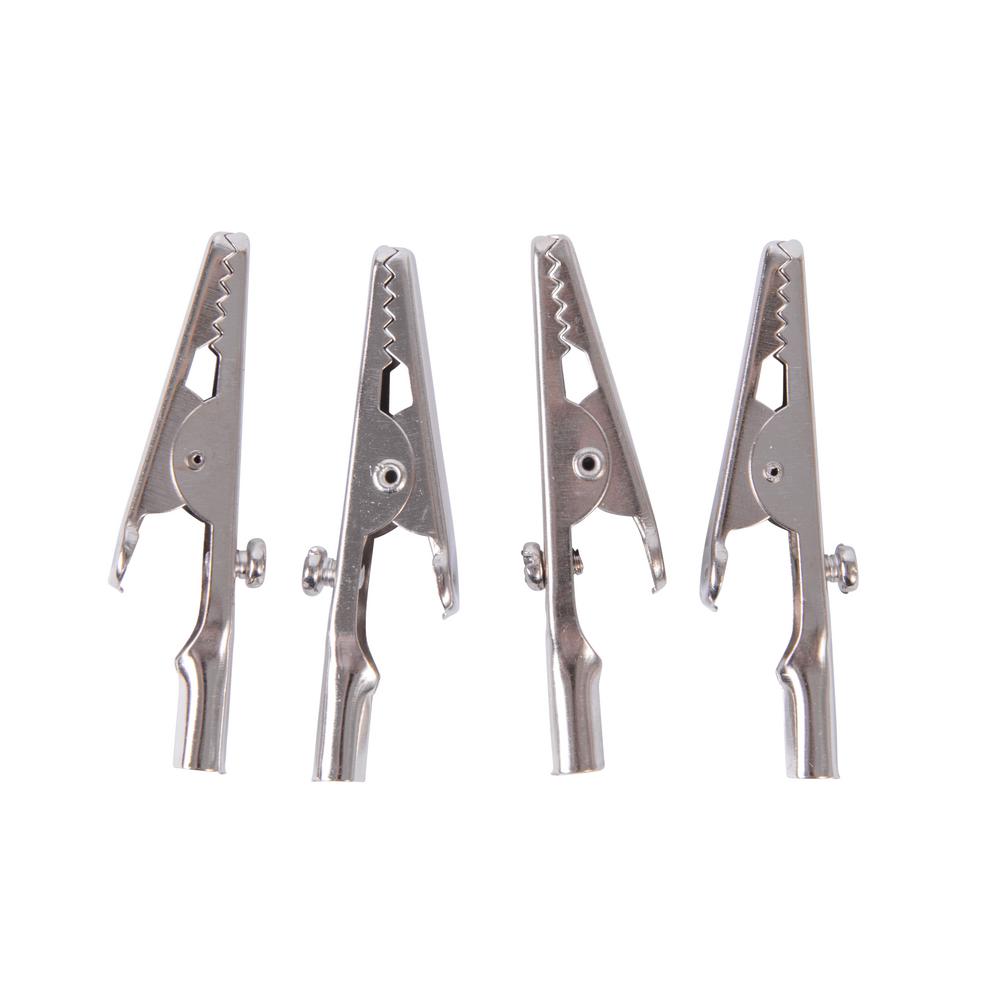
All you really need on one end can be assembled easily from parts at the automotive store or Lowes. You need two small alligator clips (minus the colored insulator covers) and a 3 ft extension cord which you cut in half to provide bare leads...and two alligator clamps to grab onto a car battery.


The idea is this. Cut your 3 foot or shorter office extension cord in half, and strip about a half inch of insulation exposing about 3/4" of bare wires. Chose either end and attach the two small alligator clips to the pair of bare wires. Attach the other LARGER alligator battery terminal clamps to the other exposed wires. Plug the molded ends of your leads into the appropriate ends of your 25 ft orange extension cord. Poof! You now have battery clamps on one end of about 25 feet of wire that runs to rocket leads on the other end with clips for your igniter/starter at the launch pad.

WARNING: NEVER LEAVE THE BATTERY CLAMPS IN PLACE ON YOUR CAR BATTERY. Momentary contact with one positive (red) clamp is all you need to launch. Leave the black negative one clipped to the negative terminal and you'll never have a dead short if you keep the red positive one free. (You will, the first one or two launches, you'll do it.)

WARNING: NEVER LEAVE THE BATTERY CLAMPS IN PLACE ON YOUR CAR BATTERY. Momentary contact with one positive (red) clamp is all you need to launch. Leave the black negative one clipped to the negative terminal and you'll never have a dead short if you keep the red positive one free. (You will, the first one or two launches, you'll do it.)
Now, I know what you're thinking. Why doesn't he take the money he's just put into building this simple circuit and buy a commercial launch controller for multiple launch pads? You're right. You should. It's the safe, NAR way to do it. But the name of this blog is the THIRFTY Rocketeer, and we do things on the cheap... BUT SAFE... side of things.

I also don't recommend using soup can lids for blast shields, but it has been done before. Also, as mentioned earlier, the clover plate from an electrical junction box can also make a dandy blast shield.
As for a launch pad, about three feet of 1/2" PVC pipe and about seven joints can been assembled into a simple tripod with an upright that can be angled for launch into the wind.... or even more simply, three legs into a tri-coupler with a hole the size of your launch rod drilled in the top will give you the minimum for a launch pad. (Plus the blast sheild, wires, leads, etc.) By careful choices, you can avoid gluing most of the joints, and your launch tripod will disassemble for transport easily.
Let me know what you think in the comments below. I'll share the best ideas.

Hi, Kirk,
ReplyDeleteI just ran across this blog today. Good stuff!
If you haven't already, feel free to check out my own blog at
https://castlerocketeer.blogspot.com
I will post your link on my 'Other places' list.